When your neck starts hurting, your first instinct is to avoid all movement.
You move less, turn slowly, and avoid anything that might make it worse. And for many people living with cervical spondylosis, that feels like the safest way forward. But here’s the catch:
Too much rest can actually make things worse.
When the neck stops moving, the muscles around it lose strength. Stiffness sets in, and pain that once felt manageable starts to feel permanent. Regular, controlled movement breaks that cycle. In this blog, we cover five safe cervical spondylosis exercises you can do at home, the movements worth avoiding, and why your upper back plays a bigger role in neck health than most people realise.
What Cervical Spondylosis Does to Your Neck Over Time
The cervical spine is the part of your spine that runs through your neck, made up of seven vertebrae with a disc between each one that acts as a shock absorber. With age, these discs lose hydration and elasticity. The space between vertebrae narrows, cartilage wears down, and small bone spurs can develop. Radiographic studies show spondylotic changes in approximately 85% of adults over 60, though many experience no symptoms at all.
When symptoms do appear, they typically include:
- Neck stiffness, especially in the morning or after sitting
- Pain that radiates into the shoulders or arms
- Reduced range of motion when turning the head
- Occasional headaches at the base of the skull
Sedentary habits make this worse. Prolonged sitting, forward head posture from screens, and inactivity all place additional load on cervical structures. For seniors (55+) managing this condition at home, knowing which exercises at home support spine health is the first step toward feeling better.
5 Safe Cervical Spondylosis Exercises to Do at Home
1. Chin Tuck

Sit upright and gently pull your chin straight back, as if creating a slight double chin. Hold for 5 seconds, relax, and repeat 10 times. This realigns the head over the spine and reduces pressure on the lower cervical discs.
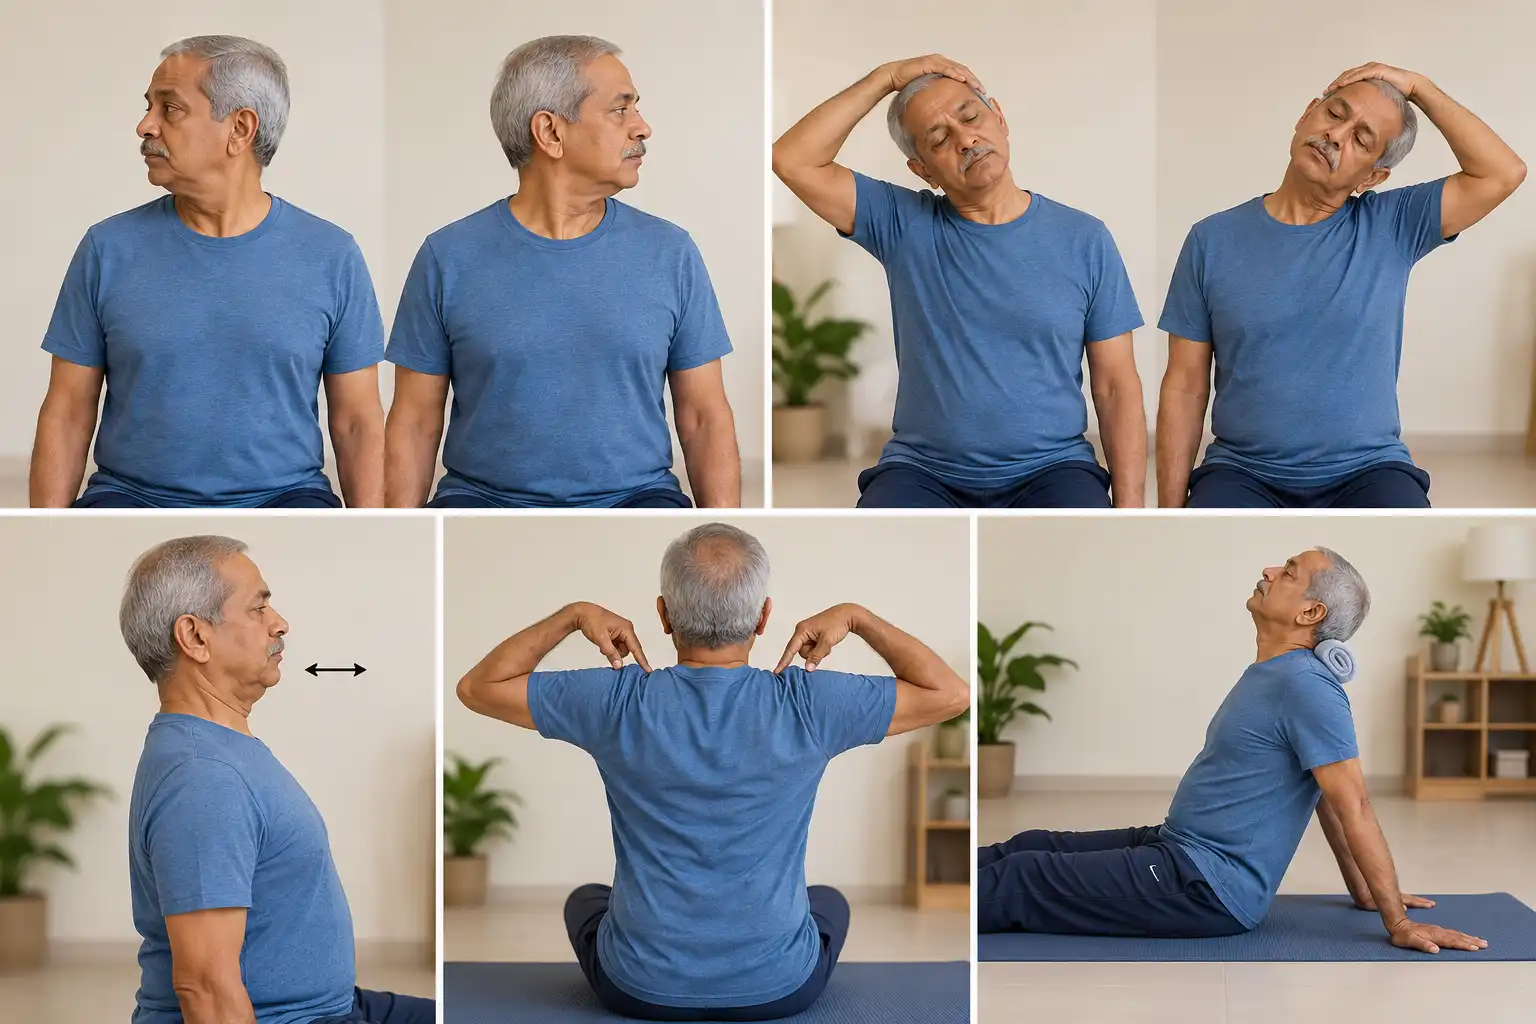
2. Neck Side Tilt

Sit with your shoulders relaxed and slowly tilt your right ear toward your right shoulder. Hold for 5 to 10 seconds, return to the centre, then repeat on the left. Do 5 repetitions on each side. You should feel a mild stretch along the opposite side of the neck.
3. Head Rotation

Sit or stand upright and slowly turn your head to the right, keeping your chin level. Hold for 5 to 10 seconds, return to the centre, then repeat on the left. Do 5 times on each side and move smoothly. Sudden turns put unnecessary stress on the cervical joints.
4. Shoulder Rolls

Sit with your arms relaxed at your sides. Roll your shoulders upward, backward, and down in a slow circular motion. Do 10 rolls backward, then 10 forward. This releases built-up tension in the upper shoulders and the base of the neck.
5. Isometric Neck Press

Place your palm flat against your forehead and gently press your head into your hand, keeping your head completely still. Hold for 5 seconds, then repeat with your hand on each side of your head and at the back. Do 5 repetitions in each position. This builds neck strength without any movement that could strain degenerating joints.
Recommended Reading:
If you are also dealing with stiffness in your lower back, check out our blog on back pain relief exercises.
Warning: These Neck Movements Can Make Cervical Spondylosis Worse
Not all neck movement is helpful. Some exercises that seem harmless can actually compress the discs and joints that are already under stress. Here is what to avoid:
- Full neck circles. Rolling the head in a complete circular motion pushes the cervical spine into extreme positions all at once. For a neck already dealing with narrowed disc spaces and worn cartilage, this adds unnecessary stress and can worsen symptoms.
- Heavy overhead lifting. This loads the cervical spine from above and can aggravate existing degeneration.
- Pushing through sharp pain or dizziness. These are signals that a nerve root may be involved. Stop immediately if you feel tingling or shooting down your arm.
- Prolonged forward head posture. Holding your head forward for hours, whether from reading, screens, or a high pillow, increases the load on your cervical spine.
Rule of thumb: if a movement increases your pain or makes you dizzy, it is doing more harm than good.
Why Your Upper Back Holds the Key to Neck Pain Relief
The neck does not work in isolation. The muscles of the upper back, particularly around the shoulder blades and mid-trapezius, play a significant role in how much strain the cervical spine absorbs. In fact, research published in PMC supports scapular stabilisation and upper back strengthening as part of a complete cervical spondylosis rehabilitation approach. Practically, this means:
- Rows and lat pulldowns that target the mid and upper back
- Scapular squeezes that activate the muscles between the shoulder blades
- Any pulling movement that trains the back to hold an upright position
For older adults (45+) looking to build this kind of functional strength safely at home, consistent resistance training for seniors is worth exploring alongside neck-specific mobility work.
Cervical Spondylosis Exercises Need a Stronger Foundation
Neck-specific exercises are a good starting point. But they work best when the muscles supporting your head and upper spine are strong enough to hold good posture through the day. Without that foundation, stiffness and ache tend to return no matter how consistently you stretch.
That muscle foundation is exactly what Ferra, a strength training equipment for seniors, is built to support. Its lat pulldown and seated row exercises directly strengthen the upper back muscles that reduce cervical strain. And because Ferra uses concentric-only resistance, there is no eccentric loading, no soreness the next day, and no pressure on already sensitive joints.
Check out Ferra and build the upper back strength that your neck depends on.
Conclusion
Cervical spondylosis is a natural part of how the spine ages. It does not have to mean a life built around pain or restricted movement.
The exercises in this article are a practical starting point. Gentle, manageable, and safe when done with care. Pair them with an awareness of the postures and habits that aggravate your symptoms, and you will start to notice a difference over time.
Consistency matters more than intensity here. Small daily movements, done regularly, build up into meaningful improvement over weeks and months. Start where you are, listen to your body, and keep moving.
Cervical Spondylosis Exercises: Frequently Asked Questions
1. How often should you do cervical spondylosis exercises?
Most guidelines suggest daily practice, or at a minimum, 5 days a week. A few repetitions spread through the day tend to work better than one long session.
2. Is it normal for exercises to cause mild discomfort at first?
Yes, some mild muscle discomfort when starting new movements is normal and should ease within a day or two. However, sharp pain, dizziness, or tingling that spreads down the arm are not normal responses. Stop the exercise if any of these occur and consult a doctor or physiotherapist.
3. Can you do cervical spondylosis exercises during a flare-up?
Yes, with caution. Gentle movements like chin tucks and shoulder rolls are generally safe even during a flare-up and can help reduce stiffness. Avoid more demanding movements until the acute pain settles. If a flare-up involves neurological symptoms like numbness or weakness, seek medical advice before continuing.
4. Are there any sleeping positions that help cervical spondylosis?
Sleeping on your back or side with a low, supportive pillow is generally the safest position. High or stacked pillows tilt the head forward and strain the cervical spine through the night, so those are worth avoiding. The worst position is sleeping on your stomach with your head turned to one side.
5. How long before you notice improvement from regular cervical spondylosis exercises?
Most people notice a reduction in stiffness within 2 to 4 weeks of consistent practice. Meaningful improvement in pain and range of motion typically follows over 6 to 8 weeks. The key is showing up daily, even when progress feels slow.


